Update: It seems you can now add menu items to the contextual (right click menu) in Finder. I no longer use Mac so I have not tried this but should be able to add a create text file entry if you like. Unfortunately I assume most would want this from the desktop.
If you moved from Windows to Macintosh you may miss the create text file right click menu. Well, I work a lot form the Desktop when messing with files and programming, because it’s easier than having Finder windows all over the place so when I create a empty text file I usually create it on the desktop. I do this by hitting:
Command + Space and typing Terminal in the search box
In the terminal I cd into Desktop (cd Desktop) and the type:
touch untitled.txt
I then open this in my text editor by right clicking it and selecting my editor.
You can also type: nano untitled.txt and save it (Control + o) after cd’ing into the path of your choice.
Update Feb. 11, 2015 I wrote a very simple Automator to add this to the contextual (right click) on a folder object. It’s easy to follow. Get it here. It’s a PDF.
or continue with the old post, which is similar and may give you some options, like opening the new file automatically in you text editor.
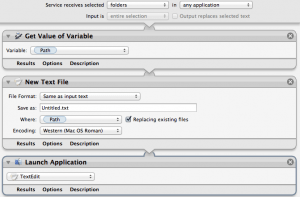
If you want to automate this in the GUI use the Automator app that’s included with OS X. We will end up with a service that will let us create and open a new text file on the desktop from anywhere. It will look a like this, and there is no programming required at all.

First off, enable Accessibility in Prefs, “Enable access for assistive devices”. Open Automator, Command + Space then type Automator in the search box. Select “Service” and name it “New Text File” or whatever. At the top select “folders” for “Service receives selected” in “any application”. Any application means it will be available no matter when has control of the menubar (statusbar).
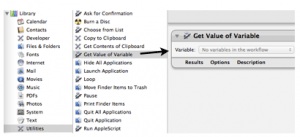
To your left you will see the library items and we need at least two. The first is the “Get value of variable” in Utilities. Drag “Get value of variable” to the main window.

To your left you will see the library items and we need at least two. The first is the “Get value of variable” in Utilities. Drag “Get value of variable” to the main window.
Now select “Text in Libraries and drag “New Text File” under the variable panel. Tick “Replace existing files” and drop down and select “New Variable” choosing Desktop when it asks. You could bypass the var and select the Desktop directly – your choice.
Save and test it in the Finder menu… It should create a text file on your desktop.
If you want to open it directly after creating, go to the library and select “Utilities” again and drag “Launch Application”, then select TextEdit, or whatever. Should look like this:

If it errors set the Desktop variable by ignoring the default ~/Desktop and drilling down to it by selecting the paths.
Yes i miss “create new txt doc” feature in my new mac, helpful guide but is there any solution which let me create text file anywhere like we do in windows ?
Regards,
Kuldeep Singh
You might be able to code it into the desktop menu, but I’m not aware of a way. I thought about i once, but never took the time to really research it. Touch command is just as fast.
There is a free addon to Finder called XtraFinder that I use. In its settings “add item to finder menus” there’s a new file option. It will add a right click create file in finder.
http://www.trankynam.com/xtrafinder/
If you want a free and more powerful file manager, check out muCommander. There some nice commercial replacements too.
http://www.mucommander.com/
Cheers, Mohawke