Creating a simple radial percent gauge in Flet
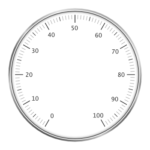
I was cleaning up and found some old gauges I had built years ago. I created the images in Inkscape and likely deleted the Flash and JavaScript code. Anyway, since I am really digging working with Flet I thought it might be cool to re-purpose the images and create a radial gauge in Flet.
Setup
So the first thing you will want to do it create a virtual environment. Once you have that you can install Flet, no other libraries are needed for this.
To install Flet just activate your virtual environment and type pip install flet. Sometimes it’s pip3.
In your folder create a folder named assets. In that folder create a folder named gauge.
Save the following three files in the gauge folder.


Initial Code
The below boilerplate code is the bare minimum to get a Flet window running. Pay special attention the the asset_dir reference in app(). This gives your app access to the assets folder so you can easily include images, fonts, etc. without needing to specify full paths. Be sure to save this code in the same folder as assets and name it with the .py extension. You can switch between running as web or desktop by setting DESKTOP true or false.
#!/usr/bin/env python3
import flet as ft

DESKTOP = True

def main(page: ft.Page):

    page.title = 'Flet Radial Percentage Gauge Example'
    page.vertical_alignment = ft.MainAxisAlignment.CENTER
    page.horizontal_alignment = ft.CrossAxisAlignment.CENTER
    page.spacing = 30

    page.update()

# MAIN
if __name__ == "__main__":

    try:
        WEB_PORT = 8000

        if DESKTOP:
            ft.app(target=main, assets_dir='assets')
        else:
            ft.app(target=main, assets_dir='assets', port=WEB_PORT, view=ft.WEB_BROWSER)

    except Exception as app_error:
        print(app_error)
If all is working as expected you should get a window when you run this.
Adding the images
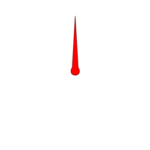
Using the assets folder we simply create three Flet images. The background and cap are static, the needle, or pointer, needs an animation. Since this gauge has a gap we need to set the needle to zero, which translate to -2.617. The gauge is divided into two sides. 0 to 50 will be negative and 50 to 100 will be positive. The needle itself needs a pivot point. This is where it will rotate at. We want to set this to the center as the needle’s bottom is centered in a square transparent image. It’s the same size as the others, 350×350 pixels. The last thing to note is the rotation animation. We want it to slow as it reaches its value and we want a nice glide as it moves. I found 800 with decelerate worked nicely but you can play around with those values.
    # Add gauge needle image. This is the only animation.
    pointer = ft.Image(
        src=f"/gauge/radial_gauge_pointer.png",
        fit=ft.ImageFit.CONTAIN,
        rotate=ft.transform.Rotate(-2.6179938779914944, alignment=ft.alignment.center),
        animate_rotation=ft.animation.Animation(800, ft.AnimationCurve.DECELERATE),
    )
    # Add the gauge background image.
    gauge_bg = ft.Image(
        src=f"/gauge/percent_gauge_base.png",
        fit=ft.ImageFit.CONTAIN,
    )
    # Add the cap image, which hides the messy needy ;)
    gauge_cap = ft.Image(
        src=f"/gauge/percent_gauge_cap.png",
        fit=ft.ImageFit.CONTAIN,
    )
Setting the containers
I originally placed the images in containers but I found that I can just add the images directly into the Stack(). Less code is always welcome. Once we add the images to the stack we can add it to the Flet page. First I am adding a textfield and button so we can assign values to the gauge for testing.
    # Stack the images to layer the gauge components.
    gauge_stack = ft.Stack(
        [
            gauge_bg,
            pointer,
            gauge_cap
        ],
        width=350,
        height=350,
    )

        # Add gauge and misc. controls to page.
    user_entry = ft.TextField(value='0')
    page.add(
        gauge_stack,
        user_entry,
        ft.ElevatedButton("Animate!", on_click=animate),
    )
    page.update()
Animate Function
All that is left is the animate function. You might have noticed the on_click for the button object named animate. I will place it at the top of the main function just under our page setups, around line 22 or 23.
    def animate(e):
        '''
        Take a value from a text control and update the gauge.
        '''
        current_value = user_entry.value

        if len(current_value) > 0:
            current_value = int(current_value)
            curr_degree = int(current_value * 3) + 210 % 360
            if (current_value <= 50):
                pointer.rotate.angle = math.radians(curr_degree - 360)
            else:
                pointer.rotate.angle = math.radians(abs(curr_degree - 360))
        else:)
It isn’t too complicated. Like I said, the gauge is divided into two sides. Here we check that we have a value coming in and if so do a little math magic. I use abs() to switch to positive number otherwise I leave it negative. Last thing we need to do is to import math. At this point it should be working.
In conclusion
Everything can be found in my Git repo including the images if you want to grab them there. Also, see the seconds automated in Git. Have fun.
Full source.
#!/usr/bin/env python3
import flet as ft
import math

'''
Simple radial gauge in Python and Flet.

Author: Charles Nichols
Date: April 16, 2023

The gauge images I created in Inkscape years ago.
'''

DESKTOP = True

def main(page: ft.Page):

    page.title = 'Flet Radial Percentage Gauge Example'
    page.vertical_alignment = ft.MainAxisAlignment.CENTER
    page.horizontal_alignment = ft.CrossAxisAlignment.CENTER
    page.spacing = 30

    def animate(e):
        '''
        Take a value from a text control and update the gauge.
        '''
        current_value = user_entry.value

        if len(current_value) > 0:
            current_value = int(current_value)
            curr_degree = int(current_value * 3) + 210 % 360
            if (current_value <= 50):
                pointer.rotate.angle = math.radians(curr_degree - 360)
            else:
                pointer.rotate.angle = math.radians(abs(curr_degree - 360))
        else:
            pointer.rotate.angle = math.radians(curr_degree - 360)

        page.update()

    # Add gauge needle image. This is the only animation.
    # I found 800 with decelerate worked well together.
    pointer = ft.Image(
        src=f"/gauge/radial_gauge_pointer.png",
        fit=ft.ImageFit.CONTAIN,
        rotate=ft.transform.Rotate(-2.6179938779914944, alignment=ft.alignment.center),
        animate_rotation=ft.animation.Animation(800, ft.AnimationCurve.DECELERATE),
    )
    # Add the gauge background image.
    gauge_bg = ft.Image(
        src=f"/gauge/percent_gauge_base.png",
        fit=ft.ImageFit.CONTAIN,
    )
    # Add the cap image, which hides the messy needy ;)
    gauge_cap = ft.Image(
        src=f"/gauge/percent_gauge_cap.png",
        fit=ft.ImageFit.CONTAIN,
    )

    # Stack the images to layer the gauge components.
    gauge_stack = ft.Stack(
        [
            gauge_bg,
            pointer,
            gauge_cap
        ],
        width=350,
        height=350,
    )

    # Add gauge and misc. controls to page.
    user_entry = ft.TextField(value='0')
    page.add(
        gauge_stack,
        user_entry,
        ft.ElevatedButton("Animate!", on_click=animate),
    )
    page.update()

# MAIN
if __name__ == "__main__":

    try:
        WEB_PORT = 8000

        if DESKTOP:
            ft.app(target=main, assets_dir='assets')
        else:
            ft.app(target=main, assets_dir='assets', port=WEB_PORT, view=ft.WEB_BROWSER)

    except Exception as app_error:
        print(app_error)